I use the "McFall" (Old Line Graphics) system of car cards and waybills to forward freight. This system has been written-up in various modeling magazines over the years.
A card with a folded-up pocket is assigned to every car, and a printed waybill slips into the pocket to determine the car's movements. Each waybill has four areas to specify the origin and destination, and the lading of the car for one operating session.
The car cards and waybills are pre-printed forms, and normally the information is written on them in pen. This seemed like a lot of work to me. Also, I wanted to use color to highlight certain areas, so I turned to my computer to solve both problems. Here are photos of a car card and both sides of a waybill.
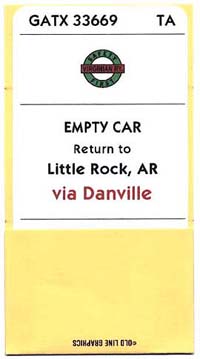
The car information is printed on a 2"x4" shipping label which is affixed to the back of a standard McFall car card (I've also cut cards from manila file folders). Notice that even without a waybill, the card tells the crew where to move the empty car. The "via" line is important, since it helps operators unfamiliar with my railroad figure out how to route the car.
Each waybill has four "cycles," but only one is visible at any time when the waybill is inserted into the car card pocket. I wanted my waybills to be larger than the McFall size, so I designed them to be printed on business cards.
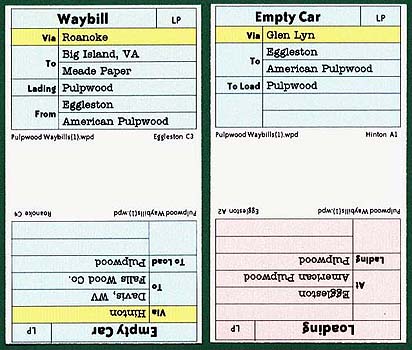
It's hard to tell in this image, but the Waybill cycle is tinted light green, while the Empty Car cycle is light blue, and the Loading cycle is pink. This color coding provides additional clues when crews pull into town with a train (e.g., pink alerts that a car is being loaded, and can't be moved).
Notice also the "via" line on the waybills. Here, it's highlighted yellow because it's the one item crews need to know about when switching cars in a train.
I'm pleased with the waybills and car cards. The printed information is much easier to read than handwritten, and the color tinting is the frosting on the cake.
Here is a locomotive card. It's printed waybill-size, and fits into a standard car card that has a “Locomotive“ label affixed instead of the usual car label.
The card provides a place-holder for the engine when the yardmaster is making up a train (possibly the power hasn't been assigned yet), plus it can hold several locomotive cards when multiple engines are consisted.
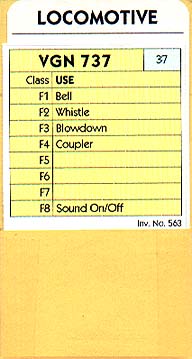
The locomotive card includes this information:
- Road number
- DCC channel to right of the road number
- Locomotive class (737 is class USE)
- DCC function numbers and associated functions
- Computer database inventory number (lower right)
These are samples of train information cards. This card is slightly smaller than the 2"x4" car card, and each crew gets one when coming on duty. It describes the purpose of the train, the work to be done along the way, and details about power and train size.
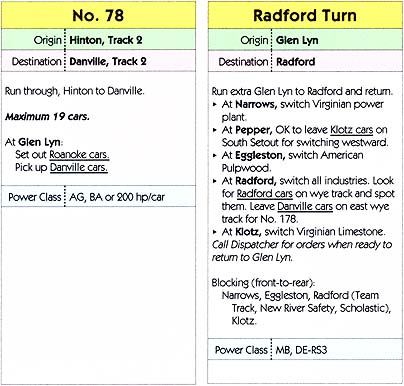
The train information card includes this information:
- Train number or name
- Origin and destination stations; a staging yard includes the track number
- Running instructions
- Maximum train length, if restricted by staging track capacity
- Switching instructions
- Car blocking order
- Locomotive guidelines (faster/longer trains need larger power)
I recently revised this card to add more information and make it easier to read. This will slightly change the way an operating session works. In the past, all crews got their train information cards from the Dispatcher, along with the other paperwork. But now the Yardmaster will start each op session holding the cards for trains originating in Glen Lyn. The maximum train length, blocking instructions, and power guidelines will help the YM build reasonable trains, and discourage thoughts of sending a 27-car train out with a 600hp diesel, into a 19-car staging track.
And finally, this is a clipboard I make available so crews can keep their paperwork and throttles under control.
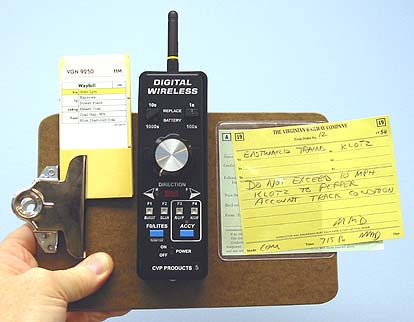
It measures 6" x 9" and costs about a dollar at OfficeMax. Held horizontally, it has space for the deck of car cards and waybills under the clip. To the right of that, I affixed a strip of Velcro so throttles (with mating Velcro on the back) can be attached. On the right end of the clipboard is a 4" x 3½" clear vinyl pocket that holds clearance cards, train orders, and other paperwork. I glued the pocket to the clipboard with 3M spray adhesive.